Guides - Deploying LiveSwitch through the Linode Marketplace
Quickly deploy a Compute Instance with many various software applications pre-installed and ready to use.
LiveSwitch Server is a self-hosted enterprise video streaming service. It provides high quality and reliable audio and video streaming and is backed by the top experts in the industry.
NoteLiveSwitch Server requires a valid license to use the software. A free 30 day trial license is available. To obtain a trial license or purchase a paid license, see the instructions within the Obtaining a License section. Licenses are not available directly through Linode.
Deploying a Marketplace App
The Linode Marketplace allows you to easily deploy software on a Compute Instance using the Cloud Manager. See Get Started with Marketplace Apps for complete steps.
Log in to the Cloud Manager and select the Marketplace link from the left navigation menu. This displays the Linode Create page with the Marketplace tab pre-selected.
Under the Select App section, select the app you would like to deploy.
Complete the form by following the steps and advice within the Creating a Compute Instance guide. Depending on the Marketplace App you selected, there may be additional configuration options available. See the Configuration Options section below for compatible distributions, recommended plans, and any additional configuration options available for this Marketplace App.
Click the Create Linode button. Once the Compute Instance has been provisioned and has fully powered on, wait for the software installation to complete. If the instance is powered off or restarted before this time, the software installation will likely fail.
To verify that the app has been fully installed, see Get Started with Marketplace Apps > Verify Installation. Once installed, follow the instructions within the Getting Started After Deployment section to access the application and start using it.
NoteEstimated deployment time: LiveSwitch should be fully installed within 5-10 minutes after the Compute Instance has finished provisioning.
Configuration Options
- Supported distributions: Ubuntu 20.04 LTS
- Recommended plan: All plan types and sizes can be used.
Getting Started after Deployment
After deploying your application using, the server will reboot once the installation is complete.
Obtaining a License
LiveSwitch Server requires a license to use the software. A free 30 day trial license is available, in addition to paid licenses. The instructions in this section walk you through the process of obtaining a trial license. To learn more about the other license options that are available to you, contact LiveSwitch directly.
Navigate to the LiveSwitch Cloud free trial webpage and complete the trial form. While you will not utilize the free trial for the Cloud product, this enables you to create an account which will be used in the next step.
Navigate to Frozen Mountain’s account page and sign in using the credentials you created in the previous step. Note that Frozen Mountain was the prior name of the company before it was renamed to LiveSwitch in 2021.
Click the Downloads link on the top right.


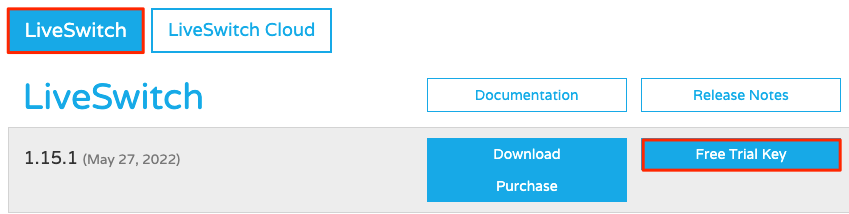
Within the Downloads page, select LiveSwitch and click Free Trial Key. Alternatively, you can click Purchase to start the purchasing process.


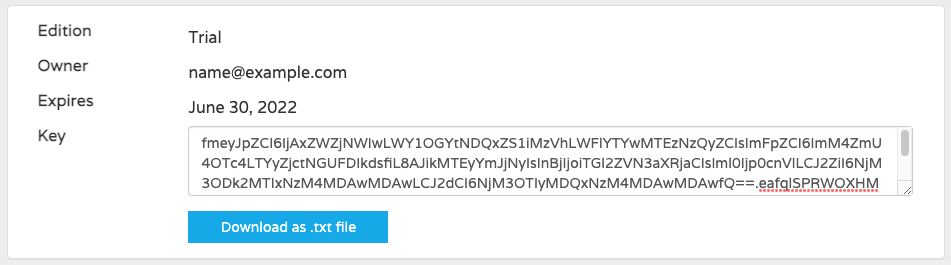
Once a free trial license is generated, it is immediately displayed on the Downloads page (see the screenshot below). Retain a copy of this license key for the Accessing the LiveSwitch App section. The license key is also visible on the main My Account page.


Accessing the LiveSwitch App
Open your web browser and navigate to
http://[ip-address]:9090/admin, replacing [ip-address] with your Compute Instance’s IP address or rDNS domain (such as192-0-2-1.ip.linodeusercontent.com). See the Managing IP Addresses guide for information on viewing IP addresses and rDNS.The Welcome setup wizard is displayed. Follow the prompts in this wizard to input your license key and create your user.
After completing the setup wizard, you should see the main Configuration Console for your installation. To learn more about how to manage your instance, see the Configuration Console documentation.
Now that you’ve accessed your LiveSwitch instance, check out the official LiveSwitch quick start documentation to learn how to further utilize your LiveSwitch instance.
NoteCurrently, Linode does not manage software and systems updates for Marketplace Apps. It is up to the user to perform routine maintenance on software deployed in this fashion.
More Information
You may wish to consult the following resources for additional information on this topic. While these are provided in the hope that they will be useful, please note that we cannot vouch for the accuracy or timeliness of externally hosted materials.
This page was originally published on